Showing posts with label Modeling. Show all posts

Thursday, May 8, 2014

Do you want to build a treeman?

Do you want to build a treeman?

Hey now, look at all the leaves!

I can not wait to smash an orc
Or crush a Gor
Or kill a dozen skaven on the way!

I used to be made of metal
and now I'm not.
Thank god I'm a plastic guy!

Do you want to build a treeman?
There are like 3 different types of treeman...

Get painting Sylvos!


Okay, bye....

If you don't get it...watch Frozen..

Thursday, May 9, 2013

The Crimson Sigil - Dark Eldar Kabalite Warriors WIP

Thought I would go ahead and post a quick WIP for the Dark Eldar army I am preparing for the 2013 OFCC 40k event this summer.  I decided to use the Kabal of the Obsidian Rose paint scheme and using Les Bursley's YouTube video I've made some rather nice progress.

I used an airbrush to prime the models white (technically Bryan did since my airbrush is still shipping).
Then I used a 1:1 heavy red/black mix to base coat the model.
I then began painting with Gory Red on the armor edges doing line highlights.


Next I used Bloody Red on top of the Gory Red.


I then used Orange Fire to edge on top of the Bloody Red and as you can see it really make the three levels of red beneath it pop.

Finally I used a 1:1 ratio mix of Bonewhite and Orange Fire to touch up the very edge of the ridges and it did a wonderful job of adding definition.


I've done 30 models so far with the Heavy red/Black, Gory red and Bloody red and I've started painting the 30 remaining Kabalite Warriors with the Orange Fire.

More updates to come!


Wednesday, February 6, 2013

Hobby Zone Product Review – Professional Paint Station and Large Paint Stand

Hobby Zone Product Review – Professional Paint Station and Large Paint Stand
I recently saw an article on BoLS about a company named HobbyZone that made “accessories for modelers and hobbyists”.  The article then showed this pretty nice paint station this group had obtained to organize their hobby space.
This company makes hobby and paint accessories out of MDF board that are meant to organize and clean up your hobby space.  This instantly appealed to me since I have been struggling for months to find a worthwhile solution for my desk to organize my paints and hobby materials.  I had been throwing around ideas to design and build my own paint rack and hobby area for months, each time ending up frustrated because the entire solution would require more time and effort to build than I was willing to devote.  Also, I had been very frustrated because I wanted a portable solution to do my hobby.  Being a new father, it is nigh impossible to sneak away upstairs for one or two hours to paint while my wife is downstairs with my twin daughters.  I needed something that would allow me to move my projects up and downstairs without disrupting my entire hobby desk upstairs.  So when I visited their site, I was very excited about what I found.
So let me take a moment to talk about the products I purchased.  I obtained the Professional Paint Station which is their large 60cm wide painting station and the Large Paint Stand.
The Large Paint Stand was a fantastic purchase; it comes in two different holder types.  The dropper bottle sized cut outs and the citadel paint pot sized cut outs.  I purchased the citadel sized which has an 84 bottle capacity (dropper bottle has a larger capacity).  The paint stand is very light weight and comes in several well cut and easy to assemble pieces.  The entire thing took me less than 2 minutes to assemble without touching glue.  I’ve already tested its weight capacity and it will easily hold the 84 paint pots without strain or bending. 
Large Paint Stand:
Cost:  $15.48
Assembly: Very easy
Materials: MDF – well cut
Overall: Very Pleased

The Professional Paint Station is Hobby Zone’s largest portable paint station.  I wanted the largest so that in case it was smaller than my initial measurements had shown, I would not have a paint station that was cramped.  This Professional Paint Station is fantastic.  It holds about 50 pots of paint as well as most of my brushes, knives and files.  It has two cup holders for water or mixing solution.  It has a bright white workspace that will reflect light back further illuminating the work area and it is amazingly lightweight.  The shelves and structure is pretty solid once built, as you can see in one of the pictures however one of the rear corners got a bit munched during shipment but it still turned out well.  The assembly was fairly simple, I ran into an issue when placing the unit onto the bottom workspace slab.  The bottom cut sections did not match up 100% but that may have been due to poor assembly on my part.  Once assembled (with Wood Glue) it is solid and sturdy.  It even has little wings you can attach on the side for when you want a model to dry.  I loaded it up with metal models, paints and few cans of Coke and it did not even so much as bend under the weight. 

Professional Paint Station
Cost: $34.44
Assembly: Easy
Materials: MDF – well cut
Overall: Pleased – I would have been Very Pleased but the bottom section not 100% lining up despite my best efforts disappointed me slightly.

I could not believe how remarkably cheap these organizers were.  I was able to reorganize my entire workstation for 50 bucks which replaced 2 shelving units, 3 boxes and a clumsy array of partial projects that were cluttering my work area.  It is also lightweight enough to where you can paint at your workstation upstairs then grab it by the handles and move it downstairs to paint at the dinner table.

I will be ordering yet another Paint Station from Hobby Zone soon – the Paint Station (40mm) which only has two levels vs. the Professionals 4 levels but it is smaller and is ideal to be taken to places like the game store to work on projects. 

In closing, Hobby Zone has done an excellent job of making an inexpensive, lightweight and quality product for hobbyists.  They are based out of Poland so the only downside to doing business with them is that shipping will cost you.

This hobbyist recommends Hobby Zone to anyone that needs a cheap and affordable organizational solution for their hobby.

Here are some of the initial images of the unassembled product and the assembly process.


As you can see the package it came in was nice and lightweight and both the Paint Station and the Paint Stand came in many pre-cut pieces. 


Munched corner =( 


As you can see here the initial assembly of the Paint Station required some paper tape to keep things together while the Wood Glue dried.  The Paint Stand fitted together nicely and you can see the size and design of it from the various angles.


Finally you have the finished product complete with little wings on the side that are removable. 

That completes my product review on Hobby Zone's Professional Paint Station and Large Paint Stand. 


Saturday, January 5, 2013

Bretonnian Battle Standard Bearer/Green Knight completed - #steakbet

Last night I went from start to finish on my Bretonnian Battle Standard Bearer/Green Knight model in roughly  six hours.  This is the 2nd to last model I needed to complete for the #steakbet to be a success.  I'll post all the pictures I took of this really kick ass model. I'm tempted to buy a few more of this model for future painting.  Anyway, here are the pictures - with my new phone I should be able to do a "once over" when I have finished the army and provide excellent pictures for each unit.

My battle standard bearer:
Sir Lloric the Sylvan Knight, Herald of the Storm Warder

Here is the box it came in which I used as its primary guide for the freehand you see later.

The sprue was well done, I had only one small imperfection I had to put a dab of glue in to fix other than that it was awesome.

Here is the model assembled - note the amount of flash I had to trim off it.

I've basecoated the black skin on the horse with Thalmar Black, the metal sections with leadbelcher and the "gold" parts with Screaming bell.  

I then used Zandri Dust to basecoat the "green" cloth areas.
 I then used Menoth White Highlight followed by Morrow White to bring up the cloth to a nice white with some highlights being designated by the Morrow White.
 I then used watered down and sadly a paint pot on its last legs - Dark Angel Green to do the freehand filigree all over the horse and riders cloth.

I added Goblin Green for the plumes, highlighted the skin and hooves with Greatcoat Grey and painted the shield with Teclis Blue, Deathworld Forest, Waagh Green, and Goblin Green.  Once those were done, I washed the entire model with varying layers of Thraka Green and then painted the Screaming Bell sections with Gehenna Gold.  Really fun model to paint!

Enjoy -


Monday, December 31, 2012

The Storm Riders of Parravon - Pegasus Knights Competed - #steakbet

Here's some images of the Storm Riders of Parravon, my Pegasus Knights and Hero completed for the Bretonnian army.  This only reinforces that I need to take the time to build a photolab =).

Anyway here are the finalized pictures - better ones to come later.


Wednesday, December 26, 2012

Bretonnian Prophetess - Lady Ravenna of Lyonesse. - Start to Finish #steakbet

Hello everyone,

I decided for the Prophetess, Lady Ravenna of Lyonesse, that I would do a full from start to finish with her to see how many steps/paints I used as well as the length of time spent with her.
Here is the finished product:

And so we begin with the assembly, the priming with Grey primer and the first base coat which is Bugman's Glow.
 Once i had finished painting all the areas of flesh I moved on to the Zandri Dust base paint for the cloak and tapers on her staff.
I then decided that I wanted her to have a red dress so I painted her dress with the base paint Khorne Red (probably one of my favorite colors to use painting).
 I then used Rhinox Hide on her staff.
I also decided that I wanted Lady Ravenna to have black, raven colored tresses so I used the P3 Thalmar Black.  I especially like this black because it has hints of grey in it which allow you to layer and highlight on top of it with ease.

I then used Screaming Bell on the Fleur-de-les about her person, followed by Mephiston Red on the what looked like Purity Seal wax and finally Leadbelcher on her sword and staff. 


I wrapped up the base coating with the Foundation paint Charadon Granite on the stone on her staff and the fur base on her cloak followed by Averland Sunset on the dress thingy in front of her red dress. (technical terms  I know).

I started the washing process with Agrax Earthshade on the cloak.  I used Seraphim Sepia on the tapers from her staff.  I used Baal Red on her dress while washing her flesh with Ogryn Flesh.  I finished up with washing her hair, metal areas and staff stone with Nuln Oil.


Now begins the Layering section.  I used P3's Menoth White Highlight on the cloak while using Evil Suns Scarlet on her red dress.  I used Bestigor flesh on her flesh tones while covered all the areas painted with Screaming Bell with Gehenna Gold.  First round of Layers done.


I decided for the second round of layers/highlights I would use Ungor Flesh to accent the Bestigor Flesh and then use P3's Morrow White to highlight the cloak.  I finally edge highlighted and line highlighted the metals with Runefang Steel.  I also used Wild Rider Red to highlight the her dress but forgot to take a picture of it.  Now on to the hair!


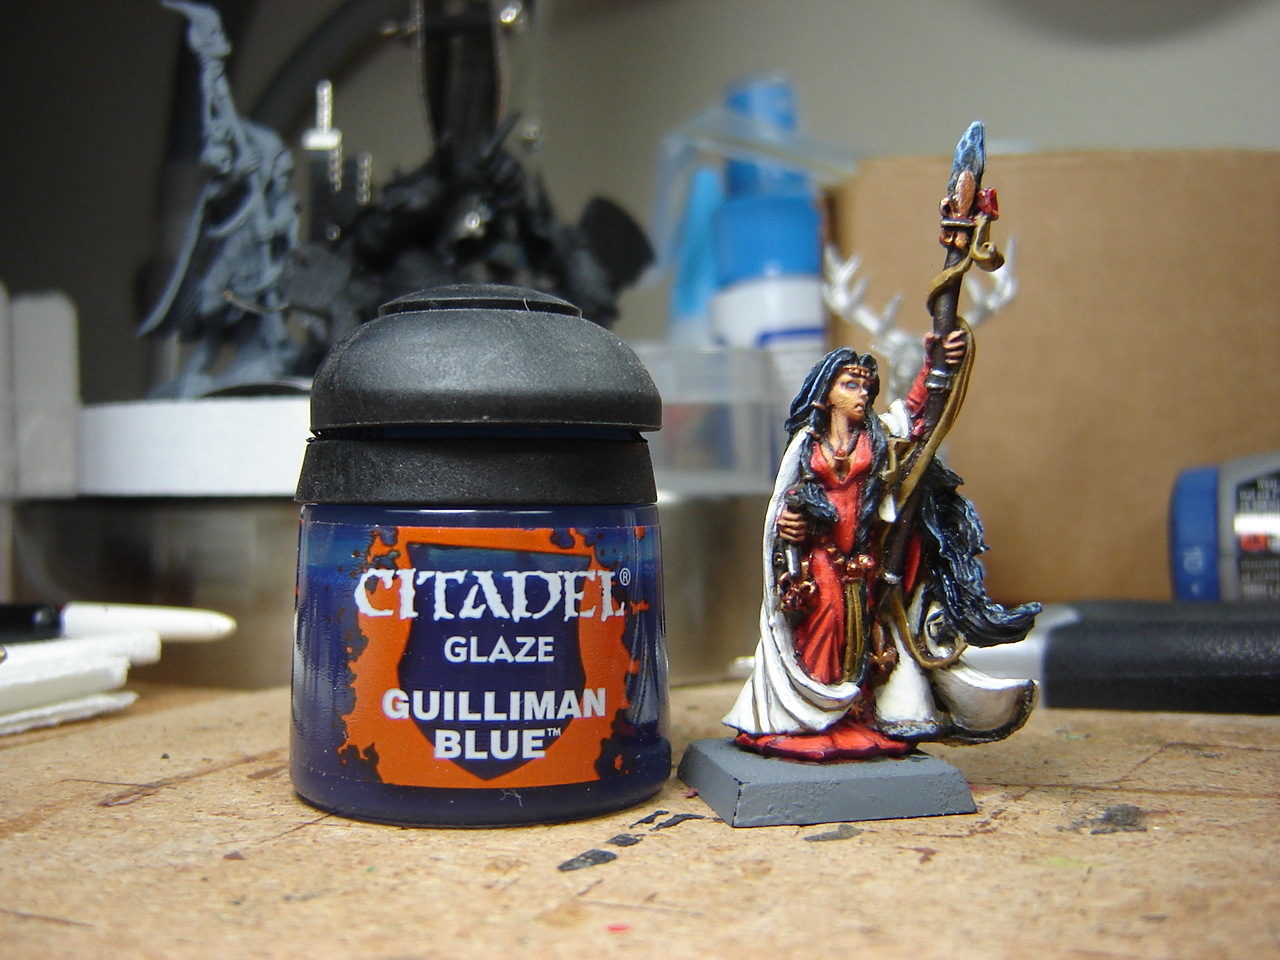
I had decided that I wanted Lady Ravenna's hair to be so black it had blue highlights.  This however can be challenging to pull off when using Black as a basecoat.  So I decided to cheat - I drybrushed the black hair and the top of her staff with Longberad Grey then promptly glazed them both with Guilliman Blue.  When it dried it provided me with the desired effect of black hair with blue highlights.  I love GW's new Glazes, they are awesome.


I then used Bestial Brown on the base and sanded, flocked and magnetized the Prophetess.


The entire process to paint this model took 5 hours (3.5 hours of actual painting) - that included harassing Bryan about Blood Bowl and my purchasing of a ....Wood Elf team (shocker!), two bottle feeding sessions with the twins, and 6 diaper changes.  I'd say it's not a bad end product for the time investment.

Now that yields yet another unit/character done for the #steakbet.

Have a good one and Roll Tide!