Monday, December 27, 2010

A new beginning, The Great Hunt 2000 point Wood Elf List.


So after many days of not posting anything due to the extremely busy holiday season, I have finally pegged down exactly what I want to run for my 2000 point Wood Elf list.  Why 2000? Well, if you recall from my previous post/rant the gaming club where I play will be gearing up for the yearly OFCC tournament soon and that has been the decided army point total.

This list is essentially my 2500 point list but with several minor changes.  I really liked how my old list played but I had to cut out the War Hawk Riders, reduce the size of my Glade Guard units and my Dryads slightly as well as reduce my Level 4 Spellweaver with the Wand of the Wych Elm down to a Level 3 with a ward save.  I did lose some offensive power but I feel that since I already know how the flow of this list works and feel confident in it that I shouldn't have too much trouble having a fun game with it.  My only concern so far is that I lost 15 shots a turn going from 2500 to 2000 and my chances of getting the spells I wanted has been reduced but that's alright.


2000 Pts - The Great Hunt, War Host of Athel Loren

Waywatcher Lord Sylvos Greystorm the Huntsman, Ranger General of Athel Loren (1#, 239 pts)
1 Wood Elf Highborn, 239 pts (General; Scout Kindred; Hand Weapon; Longbow; Extra Hand Weapon; Light Armour; Extra Attack)
1 The Bow of Loren
1 Arcane Bodkins

The Stalkers of the Silent Path (10#, 240 pts)
10 Waywatchers, 240 pts (Hand Weapon; Extra Hand Weapon; Longbow; Extra Attack; Scouts; Skirmishers)

Archdruidess Nysa Greystorm the Storm Maiden, Heirophant of Athel Loren (1#, 230 pts)
1 Spellweaver, 230 pts (Hand Weapon; Longbow)
1 Talisman of Protection

The Farstriders of Lady Dreamsinger (14#, 186 pts)
14 Glade Guard, 186 pts (Musician Mus; Standard Bearer Std; Hand Weapon; Longbow)

The Twilight Host (14#, 186 pts)
14 Glade Guard, 186 pts (Musician Mus; Standard Bearer Std; Hand Weapon; Longbow)

The Handmaidens of Durthu, the Verdant Rage (10#, 132 pts)
9 Dryads, 132 pts (Causes Fear; Skirmishers)
1 Branch Nymph

Scryah, the Last Shadow (1#, 50 pts)
1 Great Eagle, 50 pts (Flyer)

Gwynador, the Scion of the Sethayla (1#, 50 pts)
1 Great Eagle, 50 pts (Flyer)

The Wolfkin, Feral Knights of Durthu (6#, 390 pts)
6 Tree Kin, 390 pts (Causes Fear; Flammable; Scaly Skin)

The Outriders of Twilight, Huntsmen of Kurnous (10#, 296 pts)
9 Wild Riders of Kurnous, 296 pts (Musician Mus; Standard Bearer Std; Spear; Light Armour; Fast Cavalry; Magic Resistance (1))
1 Wild Hunter (Spear; Light Armour)
10 Elven Steed

Composition Report:
Points of Lords: 469 (0 - 500)
Points of Heroes: 0 (0 - 500)
Points of Core: 504 (500 - Unlimited)
Points of Special: 686 (0 - 1000)
Points of Rare: 340 (0 - 500)

Total Roster Cost: 1999


Please feel free to leave a comment about the list, I am always interested in what people think when they see a list online.  I find it interesting to see how people regard certain units and how they use them.

I will be posting my 2000 point Beastman list soon - and as soon as Forge World releases the info about the new Eldar Aspect Warriors they have I will list my 2000 point Eldar and Black Templar lists.

While the Wood Elves are played with finesse, I will be playing Beastmen the way they were intended.  Run forward and smash. Occasionally eat someone and then continue to smash. (much like the way I play my Black Templars minus the eating of someone).

Monday, November 29, 2010

Army List modifications due to Army size changes.

So the news has come in that instead of the 2500 point format that everyone had suspected would be the norm, my local gaming club and area will be shifting to 2000 points.  This decision I am not a fan of due to the fact that I have gotten very comfortable with 2500 point lists but as they say in football, rub some dirt on it and get back out there.

I will be retooling all my lists to fit a 2000 point format in Warhammer Fantasy, I may even retool all my Warhammer 40k army lists to also fit this format.  Why not make it standard for both games?

Rather than go on a long and involved diatribe about how 2000 points severely limits the functionality of many armies in a competitive arena, especially those with older army books... I will just make a few follow up posts in the next few days detailing the following lists:

The Great Hunt, War Host of Athel Loren - 2000 point Wood Elf Army
The Wild Hunt, Warherd of the Drakenwald - 2000 point Beastman Army
The Company of the Damned - 2000 point Ulthwe` Eldar Army
Helbrecht's IX Legion - 2000 point Black Templar Army

Anyway, dinner is ready and I've stalled as long as I dare before angering the better half.

Later!

Tuesday, November 23, 2010

Wood Elf Tactica - Treekin

I apologize for lack of updates in the last few weeks, gaming has been on a brief sojourn and I've been terribly busy doing other things.  (Composing a Dark Eldar army list that fits my playstyle for one).  I will start off this next topic with the tactics I use for my Treekin.  As I have said before, these are the ways that I personally use these units and I welcome the input of others on how they use them.


Wood Elf Tactica - Treekin


The Special selection for the Wood Elf army, the Treekin are arguably the best Monstrous Infantry in the game.  Why?   Well let's look at their stats first and foremost.  They are Str 5 and Tough 5 and have 3 wounds.  They are initiative 3 and boast a hefty 3 attacks each and the have both a 4+ armor save and a 5+ ward save.  Now yes they are flammable but we'll address that concern later.

The Treekin unit provides the Wood Elf army with some much needed toughness, durability and strength.  The majority of the Wood Elf army is not heavily armored nor especially tough or built to dig in and sustain multiple rounds of combat.  The Treekin however provide you with an incredible anvil to have your opponent smash into.


Let's examine the benefits and detriments of the Treekin unit.  (or as they are represented in my army as the Wolfkin, Feral Knights of Coeth Mara - teehee go go roleplaying nerdness!)

Pros:

  • Monstrous Infantry - They are able to rank up 3 wide and get all their attacks 2 ranks deep.  They are able to utilize Stomp and a standard unit of 6 will provide you with 18 attacks.
  • Scaly Skin of 4+ 
  • Toughness, Strength and Movement of 5
  • Initiative, Wounds and Attacks of 3
  • Cause Fear and are Tree Spirits (Immune to Psychology and 5+ ward save)
Cons

  • Their 5+ Ward Save is negated by magical attacks or spells.
  • They are flammable and as a result take double the amount of wounds from flaming attacks
  • They are very expensive - 65 points a piece.  A unit of 6 will run you 390 points.
In 7th edition I did not run Treekin because they were too expensive for what I was getting in return, however in 8th edition this unit has become a very serious staple in all my lists.  Now the question is, how do I use these elite monstrous infantry?

1. The Anvil -  I will march the Treekin towards what I have decided is the most threatening unit and have my opponent smash into them.  The Treekin normally can hold strong against practically anything allowing me to smash into the opponent's flanks with my other melee centered units.

2. The Shield - I will place the Treekin next to my Dryads and Wild Riders and march them forward at an angle providing the other two units with cover until the entire flank of my army is able to attack with the Treekin leading the charge.  This tactic is difficult to pull off if your opponent has multiple large blocks of infantry or massed shooting.

3. The Blender - Using my Wild Riders or Dryads as the initial charge unit, I will attempt to slam into the unfortunate enemy's flank and unleash the full strength of this fully operation death star upon them.

4.  The Roadblock - I will park the Treekin in a spot where my opponent has to engage them first or be forced to go around and get flank charged by another unit or eat 2 full 20 man glade guard units worth of arrows.  This tactic is similar to the Shield but I allow the opponent to come to me rather than me to him.

You can not be timid when using Treekin, they are tough as nails and can withstand a lot of punishment.  Using synergy with the Lore of Beasts can be ultra effective with Treekin.  Wyssan's Wildform can turn them into Treemen without the Thunderstop.  Having Str 6/T6 monstrous infantry is a nightmare to any opponent.  Lore of Life can also make them ridiculously tough giving them Tough 9!  In several of my games, I've used my Treekin to draw out my opponent and force them to engage them where I want them too.  This is perfect for Wood Elves since we work best when we can pick our fights rather than have them chosen for us.

The most optimal unit size for Treekin is 6.  I've seen some lists where people run 4 of them with only 1 rank or will run 8 treekin 4 wide and 2 ranks deep.  Honestly, for the point cost 6 give you the most bang for your buck.  Also if you are able to slam into your opponent's flank, they can negate ranks.  In smaller point games (sub 2000) taking more than 3 Treekin is really cost prohibitive but depending on how you support them with other units can be effective.  While your Treekin are tough as ...a tree, they do need support.  You need to always have another unit nearby to flank or rear charge your opponent.  Not many units if any can stand up to 6 Treekin and another unit of either Dryads or Wild Riders chewing through them.

Anyway hope this has been helpful to other Wood Elf players!

I'll post more hopefully in the next few weeks.

Thursday, October 28, 2010

REVENGE! - Battle Report Oct 27th - The Great Hunt vs. The Green Tide PART DEUX

Hello everyone, so as you know last week I had my first game against Orcs & Goblins in 8th edition.  As many of you already know, I got absolutely obliterated and conceded at the bottom of turn 2.  One would think that this type of how do you say ... posterior realignment by way of orcish sodomization would make someone hesitant to take on the same army again.  Well folks, what can I say?  I love a good challenge!  My philosophy is, if you lose and lose bad - you screwed up.  Your opponent was able to do EXACTLY what he wanted which means that you played his game and not yours.  Last week the wood elves said "Hey dude! We're gonna go ahead and lie down so that it takes less time for our bodies to hit the floor is that cool?"  This week... much better results.

Hopefully in the future I will be able to secure a video camera and just post battle report videos but in the meantime I'll be continuing to post picture and Battle Chronicler reports.  Moving forward I'll be taking a notepad and writing down everything as opposed to typing everything out from memory since I'm sure I am forgetting certain moves or events that were important.  That said, let's get down to business shall we?

My opponent Neil is a veteran wargamer and has been playing for about two decades.  He's played every army and last year his army for the OFCC was Wood Elves.  So he knows all the tricks that I would attempt to pull with my Wood Elves.  He made some small changes to his list from last week in the form of reducing his Black Orcs to 32 from 42 and changing the size of his Arrer Boyz units.  He downgraded his River Trolls to normal Trolls and added yet ANOTHER unit of 6 Trolls to the army.

Orcs have always been the bane of my existence.  For some reason they have always provided the most challenging fights for me and the first few times I engage them they absolutely kick my ass.  So I was very eager to take on Neil's orcs yet again and attempt to use what I learned from the last game in this game.

Neils' Green Tide v.2.0

Lord: Level 4 Orc Shaman
Hero: 5? Black Orc Heroes
Core: 5 units of 20 Arrer Boyz, 1 unit of 10 Arrer Boyz
Special: 32 Black Orcs, 3 Rock Lobbas
Rare: 2 units of 6 Trolls.

In the future I'll have my opponents email me their Army Builder roster so I can properly list their army.  I feel that if my opponent is going to take the time to play against me I should take the time to properly post his list. After all, that's their army and it should be displayed properly.  Ahem anyway.

Battle Scenario 2 - Dawn Attack
This scenario divides each deployment zone into 3 parts in which each player will roll a die to determine where their unit is placed.  Left, Right, or Center.  This is to represent the disorienting morning haze as the armies battle each other at the crack of dawn.  The victory conditions are straight up Victory Points and the player who wins the roll off sets up first and unless his opponent rolls a 6, the first player chooses who goes first.  Neil chose to go first this game.

Deployment


The deployment went fairly well, Neil was able to place most of his units where he wanted to and I didn't get screwed too badly.

Turn 1 - Orcs


The Orcs started off the game by moving forward and shooting at my Spellweaver Glade Guard with artillery.  I lost 4 models to his warmachines and my General took a wound from some Orc headbutt spell.   First blood to the Orcs!

Turn 1 - Wood Elves


The Wood Elf turn 1 went spectacularly well.
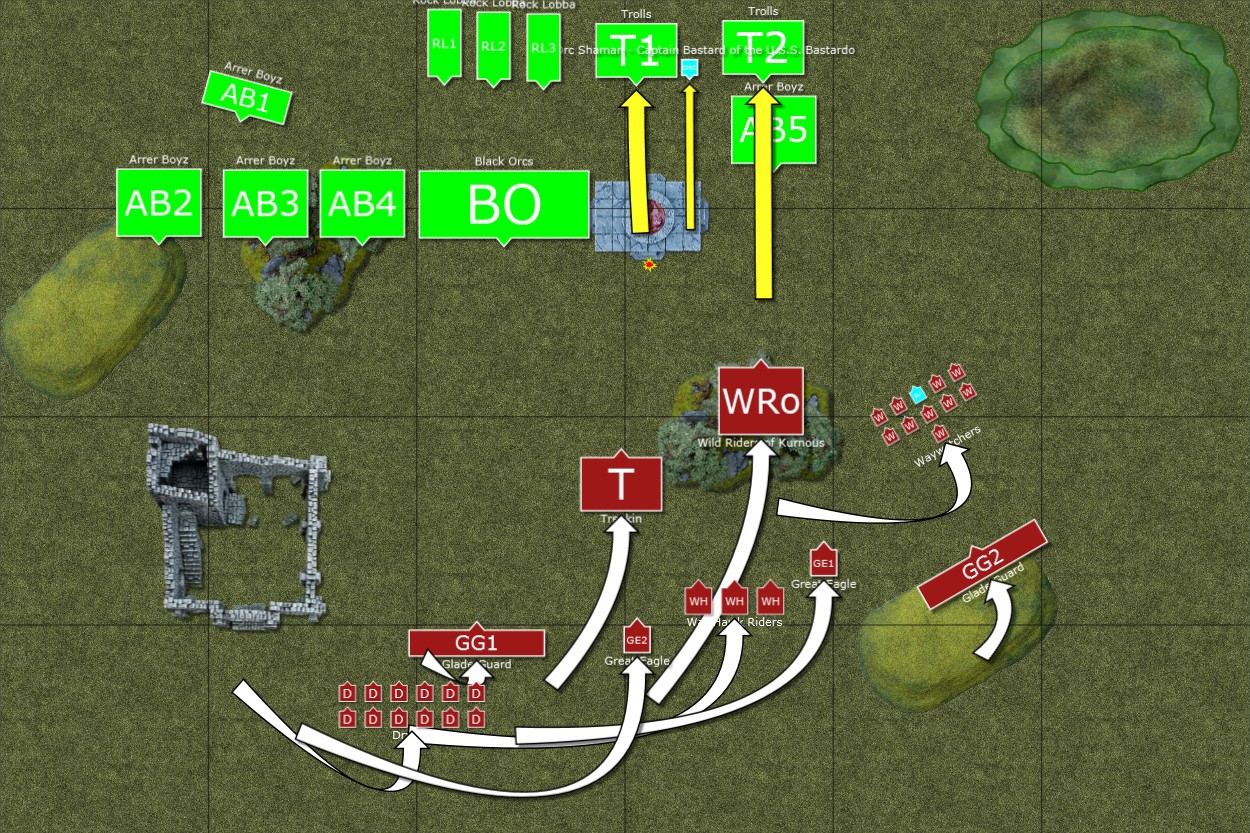
Movement Phase:  Moved to the right of the board with every unit and attempted to secure the right flank.
Magic Phase: Amber Spear was dispel scrolled, Wild Riders were augmented with Wyssan's Wildform and the nearest Trolls were hexed with Curse of Anraheir.
Shooting Phase: This is where the the turn shined.  I unloaded everything I could into the Troll unit that his general had joined.  I did enough wounds to cause a panic test which resulted in both Troll units panicking and running towards the edge of the board.

Turn 2 - Orcs


The orcs continue their slow advance unloading arrows into my Treekin and Glade Guard.  Neil charges his Arrer Boyz into my Wild Riders and manages to get a spell off that gives them Always Strike First.  Neil also causes two wounds on my Treekin from a Direct Damage spell from his Shaman.  I lose two more Glade Guard to his damn warmachines as well.

Turn 2 - Wood Elves


Turn 2 was very important since this was the point at which I conceded last game. Now this turn had some ups and some downs as you will see in the next following turns.
Movement: Treekin charge the Black Orcs, Glade Guard with Spellweaver fail their charge against the Black Orcs and the Dryads make their charge.
Magic: Black Orcs get Hexed with Curse of Anraheir, Wyssan's Wildform gets dispelled and Amber Spear fails to cast. meh...
Shooting: Again this is the highlight of the phase - I unload once again into the Troll unit with the shaman and do enough wounds to cause another panic test.  This time it causes both the Troll units to flee off the table edge as well as his General and 2 of his 3 Warmachines.  I was elated for a brief moment, then the close combat phase began.
Combat:  My Wild Riders kill the Arrer Boyz and chase them down.  The surviving members of that unit number 3.  Losing 7 Wild Riders to 20 basic Orcs should tell you how bad Orcs are to fight.  Now the annoying battle luck!  1 unit of Dryads, 1 unit of Treekin - the Black Orcs are hexed meaning they suffer a -1 to hit.  12 Dryads will yield 19 attacks (champion in unit) and 6 Treekin will yield 18 attacks + 3 stomp.  You would think with that onslaught of attacks the Black Orcs would fold right?
1 wound  - I did ONE WOUND.  So  I lose combat by 4 and the Treekin bolt, the Dryads being made of sterner stuff apparently stick in combat to continue fighting.

Turn 3 - Orcs


Turn 3 for the orcs opened with Neil charging the Dryads flank and maneuvering the rest of his archers into a better position.  His shooting phase resulted in 1 Glade Guard dying but the close combat phase is where he scored some victory points.  Dryads get wiped out and the Arrer Boyz catch them as they flee which brings them into contact with the Glade Guard.

Turn 3 - Wood Elves


The Great Eagle was also part of that previous combat in which the Treekin and Dryads were involved btw - it fled.  The Treekin rally and the rest of the Wood elves army that isnt engaged gets into better position as you can see from the movement arrows.  The Black Orcs have their numbers reduced by shooting.  The Glade Guard combat results in a draw due to the fact that I had buffed the unit with Wyssan's Wildform in the magic phase.

Turn 4 - Orcs


The Orcs advance further shooting at the Treekin and Waywatchers. The Black Orcs fail their charge against the Glade Guard.  The ensuing close combat phase results in the Spellweaver unit fleeing from combat and the Arrer Boyz only pursuing 4 inches.

Turn 4 - Wood Elves


The Treekin and Great Eagle charge the Arrer Boyz that did a number on the Glade Guard. The Warhawk Riders charge the remaining Warmachine and win. The Black Orcs take enough casualties to take a Panic test from all the shooting.  They break and flee from the Waywatchers and Glade Guard.  I attempt to cast Transofmration of Kadon only to have it dispelled.

Turn 5 - Orcs


The Arrer Boyz charge the Treekin and the Black Orcs rally.  The Treekin remain locked in combat with the Orcs.

Turn 5 - Wood Elves


The Wood Elves begin the phase by adding the Great Eagle into the mix, Sadly the Great Eagle also gets pulped by the Black Orc hero hanging out on the corner.  The Black Orcs take another brutal round of shooting. Treekin remain locked in combat.

Turn 6 - Final turn for the Orcs!


This turn could have been huge for the orcs had things worked out.  He needed to kill my Treekin and overrun into my Glade Guard as well as wipe out my Waywatchers in order to tie the game.  Neil fails the charge with this Black Orcs.  His Arrer Boyz rally however, and his 2nd unit of Arrer Boyz flank charge my Treekin.  The Treekin kill the unit and remain in combat with the now severly diminished Arrer boyz unit.

Turn 6 - Wood Elves, Retribution is at hand!


The Treekin manage to win combat and chase down the Arrer Boyz and the massed shooting destroys the last of the Black Orcs securing full victory points for that unit.

The Wood Elves are victorious!
Using the victory point rules I am estimating this VP total:
Wood Elves: 2100ish
Orks: 206


This game Neil suffered from the Leadership test bane.  I also was rolling very well but fortunately my strategy of flank attack and concentrating all my firepower into one unit worked.  While I doubt I'll win this big again against Ork, it felt good!  I was fortunate in that I never had any units except my Great Eagle and Dryads fully destroyed.  I had massive casualties in several units, only 2 units were at full strength but since you have to wipe out the entire unit to score the VP's - I was able to move the reduced units away and out of harms way.

Overall, it was a good game and I fully enjoyed it.

Thanks Neil!

Monday, October 25, 2010

Battle Report Oct 21st - The Great Hunt vs. Clan Pestilens - 2500 points

The Great Hunt took on the nefarious Clan Pestilens on the field of battle last Thursday.  This was my second time facing Skaven and my very first time facing a large 2500 point force of the rats.  My opponent informed me that he was using a Special Character in order to fulfill the theme he wanted to pull off with the army.  I said it was no problem and we set off to play.
I know in my gaming club there is a bit of a bias against using Special Characters.  I think this bias springs from previous editions of Warhammer and 40k where Special characters would herohammer the entire game because they were far and away better than an entire unit.  With the newer army books and codices out there, I've seen an emergence of special chars being used again.  My personal philosophy is that I don't really care what you bring as long as you aren't a douche about it.  I figure if you are gonna spend 500 points on a named guy, that's 500 points you aren't spending on units.  Anyway - segue complete.  I'm hoping this new format for battle reports is easier to read, a buddy of mine recommended leaving the images full size and posting the information below it. We'll give that a go this post and see how it works out.

I really liked the army I went up against.  This was a completely Clan Pestilens list that did not have anything but Clan Pestilens (except the BSB).  

My army list - The Great Hunt, War Host of Athel Loren - it's on the blog here.

My opponent's list:
Lord
- Lord Skrolk
Hero
- Battle Standard Bearer w/ Banner of the Horned Rat
- Plague Priest riding a Plague Furnace
Core
35 Plague Monks w/ full command and some 1 use banner for plague monks
35 Plague Monks w/ full command
36 Plague Monks w/ full command
Special
10 Plague Censer Bearers
10 Poison Wind Globadiers
1 Poison Wind Mortar
Rare
Plagueclaw Catapult
Plagueclaw Catapult

So as you can see it wasn't a bad list, plenty of neat themed units and I have to say Plague Monks are a bit of a pain in the ass.

Battle Scenario - Mission 5 - Meeting Engagement
This mission type has the board divided diagonally with a 12" neutral zone in the center.  My opponent and I forgot to roll dice to see what units were in reserve at the beginning of the game but after the game we both agreed it would not have changed things much if at all.

I rolled and won the chance to deploy first.  This battle mission requires you to deploy your entire army first then your opponent.  

When the board was set up for us, we decided that terrain would be mysterious if we rolled a 1 when pointing to it.  Out of all the terrain on the board, only 2 pieces became mysterious.  A forest and one of the walls of the fort.  Everything else was mundane. 

Deployment 


Deployment was fairly straight forward, I positioned my units to provide my army an open lane for combat and shooting.  My opponent deployed and I wasn't fully sure as to what he wanted to accomplish until turn 2-3 where his deployment made sense.

Turn 1 - Wood Elves


Turn 1 I decided to go on the offensive against the Skaven army.  I moved all my close combat units forward while maneuvering my ranged and flying units into optimal placment.
Shooting:  Plague Monks (Unit 1) took 2 units worth of Glade Guard shooting and had their numbers reduced by 1/4th.  The Plague Censer Bearers (Unit 5) were shot down by the Waywatchers and my General causing a panic test in both the Poison Wind Globadiers and the Poison Wind Mortar.  The result was both units fleeing off the table. 

Turn 1 Clan Pestilens


In response to my shooting of his units and the subsequent panic tests, Steven charged my Dryads with his Plague monks (unit 2) and my Treekin with this other Plague Monks (Unit 1).  He managed to hit my Glade Guard with a plagueclaw catapult shot dealing some casualties.
Close Combat - Dryads die to the Plague Monks while Treekin manage to hold true to the course.


Turn 2 - Wood Elves


The Wood Elves move to get into better position while the Wild Riders move to threaten the Plague Furnace flank.  
Shooting: The Waywatchers inflict 2 wounds on one of the catapults and the Glade Guard shoot up the Plague Censer Bearers (Unit 4).  The Treekin managed to remove an entire rank and a half of Plague Monks but they make their panic test and stay in it!


Turn 2 - Clan Pestilens


Alrighty, the Plague Monks charge the Treekin (unit 2 Plague monks) and the Plague Censer Bearers attempt to charge the Glade Guard and are killed for their foolishness.  In return the Plague Furnace hits the Wild Riders with a plague template killing 1 and the Glade Guard lose a few more to another catapult shot. The Treekin hold tight in combat.


We ran into an issue where his Banner of the Horned Rat and my Battle Standard Bearer were both within 12" of each other so we decided that in order to prevent more than one reroll for LD tests that we would just roll once and call it good.


Turn 3 - Wood Elves


The Wild Riders and Great Eagle charge the Plague Monk/Plague Furnace unit while the Glade Guard, Waywatchers and Warhawk Riders unload into the Plagueclaw Catapults.  The Treekin finally fold after dishing out some seriously awesome casualties - The Battle Standard Bearer and his General both fall to the Treekin before the Plague Monks wipe them out.  The Wild Riders inflict some 13 wounds on the Plague Monks manning the furnace and only take 2 wounds in return.  I got really, really lucky with Toughness rolls against the Billowing Death of the furnace.  


Turn 3 - Clan Pestilens


The Plague Monks (unit 1) still with a good amount of monks left charge my Glade Guard.  I wish I had chosen to Stand and Shoot instead of fleeing but I wasn't sure what his other unit of Plague Monks was going to do and I didn't want to take on 2 units and risk being wiped out.  Steven instead moved his other unit into flanking position and shot at my Waywatchers and Glade Guard with his catapults.  Both units of Glade Guard ended up fleeing that turn which sucked.  Wild Riders still hang in there taking out another 8 or 9 plague monks and inflicting another 2 wounds on the Plague Furnace.  Wild Riders lose 3 and win combat but Plague Furnace sticks with it.


Turn 4 - Wood Elves


The other Great Eagle and Warhawk Riders charge the catapults while my BSB glade guard make their leadership test and turn around.  The Spellweaver unit fails their leadership and continues to run.  The Great Eagle battling the Plague Furnace unit dies and Wild Riders suffer another casualty and make their leadership test.


Turn 4 - Clan Pestilens


This turn I thought it was all over for the Wood Elves but it turned out pretty well.  Plague Monk unit no.2 flank charges the Wild Riders causing them to flee with 2 models left.  Plague Monk unit 1 charges the BSB glade guard and take horrific casualties with their stand and shoot but make it into base to base.  Both catapults die to my Warhawk Riders and Great Eagle.  Glade Guard hold off the Plague Monks with 3 models left!


Turn 5 - Wood Elves


Turn 5 was the turn of Sylvos making Leadership tests finally.  Wild Riders roll insane courage and rally and the Spellweaver Glade Guard rally. I unload into the smaller Plague Monk unit (unit 2) and destroy it. I finally am able to get a spell off with the Spellweaver and hit Plague Monk unit 1 with a hex.


Turn 5 - Clan Pestilens


This turn ended up with Plague Monk unit 1 failing a charge against my Glade Guard and eatting a ton of arrows reducing them to 1.5 ranks and the Plague Furnace charges the remaining 2 Wild Riders and destroys them.  


Turn 6 - Wood Elves


Turn six opens with my Glade Guard spellweaver unit charging the remaining Plague Monks (Unit 1) and my Waywatchers and Warhawk Riders removing enough plague monks to reduce the furnace to just the furnace.  I finally pull my Ace out and get Transformation of Kadon off, turning me into a dragon.  I cast it with irresistable force, causing 2 casualties and making me lose 2 wizard levels but oh well.  I still turned into a friggin dragon and the Plague Monks get flattened.  


Turn 6 - Clan Pestilens


The final salvo of the Plague Furnace was perhaps the most magic my opponent got off the entire game.  Up to this point we had been shutting each other down every magic phase.  I'd fail a spell or he'd get dispelled.  With my Spellweaver in dragon form I wasn't able to use her to dispel him so he was able to get Pestilent Breath off on my Waywatchers and killed them all but the general but sadly he managed to get Vermintide off as well hitting my General with 14 hits and inflicting 8 wounds.  Sylvos failed by 1 wound and died.  


Final Score -
Wood Elves - 2117
Clan Pestilens - 1949


The Great Hunt, War Host of Athel Loren was victorious!


Reflections:
This was a pretty gruesome fight, I got very lucky every round with my Wild Riders and due to the fact that magic was not an issue this game we were able to really grind units out fast.  Looking back I would have changed some charge reactions and perhaps concentrated firepower more on the plague furnace rather than the plague monk units.  His general was definitely a cause for concern but I feel I could have dealt with him later and maybe not pushed my Dryads out so far.  I did not expect him to charge both units first turn, I was hoping to get a multi-charge off with the Treekin/Dryads but you saw how that went. 


I really enjoyed this fight, I thought I was losing most of the game until turn 5 where I thought I had a chance.  Skaven definitely are not an easy army to fight and while this was a themed list I know there are much worse Skaven lists out there to fight.  This however was a fantastic army to go up against and look forward to fighting it again in the future.


Friday, October 22, 2010

Warhammer Fantasy Battle Report - Wood Elves vs. Brettonia: 2500 point battle

Tonight I went to a friend's house and got a few games in while watching football.  I was able to get 2 games in while the football game was on and managed to score two wins.  I'm glad I was able to get these wins after last night's complete gutterstomping of my Wood Elves.  Nick and his buddies have been playing Warhammer and Flames of War for years so I was glad I got to go up against yet another group of experienced players.

The Great Hunt - Sylvos's 2500 pt Wood elf army list is Here .

Nick's Brettonia was comprised of:
1 Lord on a Hippogriff
1 Level 4 Prophetess mounted on barded warhorse
1 Footslogging paladin
1 BSB Paladin mounted on barded warhorse
39 Men at arms w/ full command - footslogging paladin went here
30 Men at arms w/ full command
9 Knights of the Realm w/ full command
3 Pegasus Knights
8 Questing Knights with full command - BSB went here
8 Grail Knights w/ full command - Prophetess went here
Trebuchet
15 Grail Reliquae

Mission Type:  Battle for the Pass - Mission 3
Army Size: 2500 


Deployment:  I rolled higher and got to place first.  You can see that I attempted to stagger out my side of the field in order to ensure my units were able to work together without stretching myself too thin.


Turn 1 


Wood Elves - It was fortunate that I was able to go first (and the fact that Nick chose to go second so he could get his ward save).  The first thing I did was to move my units into position (the white arrows should show you exactly where I moved) during the magic phase I hit his Grail Knights and Prophetess with the Amber Spear.  He needed to roll a 22 to dispel and sadly rolled a 21 losing 3 knights in a file. He further lost the entire unit to my Waywatchers and General hammering down on him with Killing Blow and Arcane Bodkins.  The unit was destroyed.  The Glade guard managed to inflict enough casualties on his unit of 30 man-at-arms to cause them to break which also made his Grail Reliquae flee.  The Warhawk Riders scored a casualty on his Questing Knights.


Brettonia - Nick failed a charge with this Questing Knights because the Warhawk Riders opted to flee.  The General was gunned down by the Waywatchers and General's stand and shoot reaction. The Knights of the Realm charged the Wild Riders and the Grail Reliquae was able to pass their morale test.  The Trebuchet scored 6 casualties on the Spellweaver Glade guard unit.  Wild Riders and KotR fought and remained locked in combat.


Turn 2


Wood Elves - Great Eagle and Dryads charge the Pegasus Knights, waywatchers move into position to shoot the warmachine.  Waywatchers manage to kill the warmachine and the Wild Riders and KotR still remain in combat.  Dryads and Great Eagle manage to kill 1 Pegasus Knight but remain locked in combat.


Brettonia - Men at Arms charge the smaller Glade Guard unit, losing a lot due to stand and shoot but made it into base to base but the Glade Guard hold due to reroll to LD granted by BSB nearby. Wild Riders route the KotR but the Questing Knights demolish the Dryads and force the great eagle to flee off the board.  Grail Reliquae charge the Waywatchers, they do good damage but Waywatchers win the battle but the stubborn Grail stay in it.

Turn 3


Wood Elves - The warhawk riders charge the Pegasus Knight and end up chasing them off the board after a successful round of combat.  The Spellsinger turns into a Dragon and eats the Men at arms and the Waywatchers still battle it out with the Grail Reliquae.


Brettonia - Questing Knights charge and kill the BSB Glade Guard unit while the Men at arms unit position themselves to charge the Great Eagle.


Turn 4


Wood Elves - Great Eagle and Wild Riders charge the men at arms unit and wipe them out while the Spellweaver demolishes the Questing Knights. The waywatchers kill the Grail Reliquae.


Brettonia - The last pegasus knight runs off the board and the Wood Elves win the battle.


Battle Summary - 
I really hope this battle report was easy to read and make sense of because I had to do most of the battle by memory and it was one of two games that night.  I attempted to summarize as much as I could without leaving out too much critical detail.  I am hesitant to use my camera much due to the number of magnetic items in my figure case so I felt this is a good alternative.
If you folks like this battle chronicler reporting software let me know and I'll keep using it.  I think as I get more familiar with it the battles will be a bit more precise and make more sense.

The Brettonians in this game just got absolutely unlucky with ward saves.  Losing his Level 4, Grail Knights and General in the 1st turn was brutal.  While he did manage to chew up a good amount of my army, the dice really were hot for me this game.  Oddly enough, the unit that is normally my anvil and most destructive didn't do a single thing this game - the Treekin.  Go figure.  They did earn their keep against the Skaven in the next game.  I'll try to get that battle report posted tomorrow.

I had a blast playing against Nick and his friends and I'll be sure to play against them sometime soon.

Thursday, October 21, 2010

Experimenting with Battle Chronicler

Here is essentially the game I played last night against Neil.  I'm testing out how this looks and if I can master the may the program works, all my battle reports will be in this format from now on.  I'm not going to narrate this post since I'm mainly testing out the images from the battle program.


Deployment


The Green Tide Turn 1


The Great Hunt Turn 1


The Green Tide Turn 2

Wednesday, October 20, 2010

What the Waaaaaaaaagh??

So I have had the opportunity to play against every army in the Warhammer Fantasy game with the exception of the Orcs and Goblins army.  Being a 40k player and an Eldar player to boot, I have always had you could say a bit of animosity towards Orks in general.  In fantasy, I have now found a new nemesis!  I had been expecting to take on my friend Neil's Empire army, I was surprised when he pulled out a horde of green skinned orcs to take on my Wood Elves.

We played 2500 points and rolled the Watchtower scenario for our battle mission.  Neither of us having played the Watchtower mission meant we got to play something new for a change.  Neil's army was comprised of over 120? orks with 42 of them being Black Orks.  Oh boy!  I had never fought them before so it was going to be a learning experience to say the least.
Neil's Green Tide - from what I can remember.
3 Rock Lobbas (?)
Level 4 Orc/Goblin Shaman
6 River Trolls
42 Black Orks
4 or 5 units of 20 orks with bows
3 black orc characters

I rolled and won so I got the Watchtower turn 1.

I foolishly deployed one of my 2 units of Glade Guard in the tower and then Neil set up his orks and I my Wood Elves.

Deployment

Turn 1 Pirate Orcs of the Green Tide -
His Trolls were stupid for turn 1 including his caster with that unit.
His entire army shot at my Waywatchers killing only 1 due to him needing 8's to hit.
His warmachines killed 4 Glade Guard from his templates.
Turn 1 Wood Elves
Entire army moves forward.
Venom Thicket rolled for woods the Wild Riders run into.
I get my +3 str/+3 attack spell off on waywatcher general
Amber spear gets dispel scrolled.
I kill 11 Black Orks with an entire round of shooting - they pass their panic test.

End of Turn 1

Turn 2 Orks
Neil declares a Waaaaaagh! Entire army moves forward ... a lot.
Neil declares his charges and makes all his rolls.
Wild Riders = charged and flanked by 2 units of Orks
Treekin = charged by Trolls
Watchtower = charged by Black Orks
Dryads = charged by 2 units of orks
Great Eagle no.2 = failed charge by Orks
Turn 2 Magic Phase -
Neil casts "Waaaagh" giving his entire army Always Strike First and rerolls to hit.  John fails his dispel roll...twice (thx Wand of Wych Elm! sigh...)
Turn 2 Ork Shooting - 4 more Glade Guard die to war machines
Turn 2 Close combat
a. Dryads all die and are chased down
b. Treekin lose combat and flee with Trolls 1 inch behind
c. Wild Riders lose half their number and flee, Orks 1 inch behind
d. Eagle fails panic test, flees
e. Waywatchers fail panic test and flee (failing the BSB reroll I might add)
f. Glade guard in watch tower would have melted but I called the game right there.

Turn 2 Wood elves - there was no bottom of turn 2.

I have to say I got absolutely TROUNCHED and it was AWESOME.  I totally learned how not to engage orks and what to do against them.  One of my better learning experiences in wargaming.  I personally do not mind losing, especially when it's against something I've never battled before.  I learned so much this game and guess what folks, I've got a rematch next week against Neil's Orks and they are going soooo down.

What not to do vs. Orks if you are a Wood elf player
1. Put glade guard in watch tower, should have been dryads.
2. Move to attack them, I should have made him come across the board and sacrificed my Dryads
3. Shoot at a different unit other than Black Orks to cause chain panic tests.
4. Omg roll better, I think my dice got scared and said "to hell with this game".

Over all, one of my more favorite losses so far in Fantasy.  Next week there shall be blood and it will be GREEN!

Tuesday, October 19, 2010

Wood Elf Tactica - Wild Riders of Kurnous

This will be the second post in my series on Wood Elf Tactics for Warhammer Fantasy 8th edition.  This topic will focus on ways that I use my Wild Riders and various methods of fielding, deploying, fighting and maneuvering them on the battlefield.  I will divide the post into three parts: Configuration, Deployment and Engagements and finally Synergy.


The Wild Riders of Kurnous, Outriders of the Lord of the Hunt.

The Wild Riders of Kurnous, the elite vanguard that serve as Orion's personal guard in the court of Athel Loren.  Part asrai, part fey, these mounted warriors channel the fury of the God of the Hunt as they charge into battle against the enemies of Athel Loren.  Whenever they leave the court of Orion, it is to engage in the Wild Hunt.  A mystical rampage that leads them to wreck havoc across the Old World in the pursuit of their quarry.


In game terms, the Wild Riders of Kurnous are a Special selection in the Wood Elf army.  They are elite fast cavalry that focus on close combat.  They are arguably the best Fast Cavalry in the game due to their high weapon skill, good strength, high movement and their special abilities.   

The Wild Riders have the following abilities that set them apart from most units.
1. Forest Spirits - this special rule means that they are Immune to Psychology, their attacks are all magical and they are granted a 5+ ward save (except against magical weapons/spells).
2. Elven Steeds - they are mounted on Elven Steeds that have a movement of 9
3. Fury of Kurnous - in close combat, if the Wild Riders did not charge they are granted an additional attack.
4. The Wild Hunt - they get a free musician and cause Fear the turn they charge
5. Talismanic Tattoos - grants them a 6+ ward save against all attacks and Magic Resistance of 1.

These special abilities give the Wild Riders an exceptional edge over most opponents. They will generally hit opponents on 3's and in the round they charge wound on 3's.  While they are Toughness 3, they are still fairly difficult to hit due to their high weapon skill, not to mention their initiative of 5 means they are generally going first in most combats.

The question is how do I actually field these models then?

Configuration


Wild Rider units may be fielded in one of three ways; Harassers, Rank Breakers, or Anvils.

Harassers - When fielded as Harassers, the Wild Riders are fielded in 1 rank composed of 5 to 6 Wild Riders.  They should have a Standard Bearer with either the +1 Movement Banner or the Terror Banner.  This set up allows them to function as War Machine hunters, outflankers and character hunters.  Since they are Fast Cavalry, they are able to move around the enemy's flank and get behind easily.  If they have a Terror Banner then they can rear charge units and hopefully make them flee into your larger anvil units.  They also are durable enough to take on your opponents ranged units and chew through them while the rest of your army focus fires on another group.  The typical point cost of this unit is around 148 points without a magic banner.

Rank Breakers - When fielded as Rank Breakers, the Wild Riders will have 2 ranks of 5 to 6 models each with a full command.  The unit will be roughly 10-12 models big and have the support of a banner (if points allow) such as the Armor Piercing banner or the Terror banner.  Rank Breakers serve to remove rank bonus's from your opponent's block of troops.  You will hopefully have a larger unit such as Eternal Guard of Treekin serving as your anvil so that your Wild Riders can slam into the flank and begin to crush the unit.  The rank breakers sole purpose is to aid your bigger, tougher units like Treekin to ensure you are able to win. The typical point cost of this unit is around 296 to 348 points without a magic banner.

Anvils - When fielded as an Anvil, the Wild Riders will have 3-4 ranks of 5+ models each.  The unit will contain a full command, magical banner and a character.  Another popular option is to field the unit 3 ranks deep and 10 models wide.  This type of configuration will include at least 1 character, generally two.  The characters will usually be a Lore of Life Spellweaver on a Unicorn holding the Rhymer's Harp (5+ ward save that isn't negated by magic attacks for the entire unit) and a Wood Elf Noble Wild Rider Kindred with a Crown of Command making the unit LD9 Stubborn.   The other configuration is to have a Wild Rider Highborn with the crown of command and the Dawnspear and field him with 28 Wild Riders.  Wild Riders in this capacity need to be properly outfitted and supported otherwise they will fail.

Deployment and Engagements


Fielding your Wild Riders well is incredibly important.  If their role is to be harassers then you will definitely want to take advantage of the Vanguard special rule.  That 12" free move at the beginning of the game means if you march turn 1, you will effectively had moved 30 inches.  If you are using them as an anvil, you will want to position them in front of your opponents smallest rank and file unit. You want to be able to bust through their line and slam into their "killy" unit from the side or behind.  Remember, you're a wood elf and have the ability to pick your own battles due to high movement and forest walker.  If you are using the Wild Riders as Rank Breakers make sure you field them near to your anvil unit and hopefully avoid getting them entangled by a smaller unit before their responsibility is fulfilled.

Synergy


Ah, this is the part of the topic I have been looking forward to.  I learned long ago that you really can not depend on a single unit to beat another unit one on one.  I guess it comes from getting my teeth kicked in with my Eldar constantly by attempting to take on chaos space marines or tanks with Guardians by themselves.  It wasn't until I learned to utilize synergy that my tactics came together and I started to win...a lot.

Wood elf Synergy - The Wild Riders operate best when you have a big anvil unit for them to flank with.  Treekin come to mind as the best fit for their charging partners.  You never want to have a unit of Rank breakers go into battle unprepared.  The unit should be buffed or augmented.
1. Unit Synergy - flanking with Treekin or having other units like Eternal Guard of Giant Eagles flanking their model helps out Wild Riders a lot.
2. Magic Synergy - Lore of Life can significantly increase the longevity of your Wild Riders. Turning them into Toughness 7 models gives them serious staying power. Lore of Beasts can make Wild Riders even better at killing in close combat using Wyssan's Wildform.  Also, spells like the Hidden Path from the Lore of Athel Loren allow Wild Riders to escape being shot at and give them serious maneuverability on the field.
3. Character Synergy - The type of character you field can completely change how your Wild Riders function for that battle.  If you take a Spellweaver in the unit then you will more than likely be tougher and harder to kill, yet if you take a Highborn or a Noble then you become even more melee focused and as a result better in close combat.

In closing, the Wild Rider unit is one of my favorites in the Wood Elf army book.  They provide a tough unit (by Wood elf standards) that can go out and wreck absolute havoc on your enemy.  Wild Riders need to win the combat they are in, prolonged combat doesn't work so well for the Wood Elf army.  You should decide what role you are looking to fill in your army before deciding to field Wild Riders however.  Many folks will just throw them into their list because they "had the models" or they wanted to have cavalry.  That's fine but if Wild Riders aren't given  a purpose or support they fold because keep in mind, they are only toughness 3 models.  Anyway, I hope you are able to get something out of this article. I enjoyed writing it.

Sunday, October 17, 2010

Army Showcase - The Great Hunt, War Host of Athel Loren - Wood Elf Army Part 2

I've decided to do another post showcasing the Wood Elf army since the original showcase pictures were washed out by the camera flash.  I'm experimenting with different light types and so for this showcase I decided to take advantage of a sunny day and some nice shade to get "natural" looking pictures.  Hopefully these look better than the original batch and I'll be doing similar posts for my Eldar, Black Templars and Beastmen in the future.  So without further ado, I present Army Showcase Wood Elves - part deux!

You'll notice there are two different scene set ups.  I was messing around with using some of my terrain to make the pictures look a bit more staged.  I think I like the pictures without scenery better.  They seem cleaner? I guess.  I'm still working on setting up my own macrophotography studio in my house so that I can just point and click, I found some rather helpful tutorials on the From the Warp blognetwork (http://fromthewarp.blogspot.com/)  as well as some articles on Dakka Dakka (http://www.dakkadakka.com).   Either way hope you enjoy them.